by | | blog

Why dockerizing DBcloudbin (or any application)? The answer is simple and clear: from DBcloudbin we want to make life easier for our users, and Docker is the way to do it. Here are some reasons that support this idea:
- Container provisioning/deprovisioning is extremely easy for users.
- Avoid third party software installations or software dependency problems (with java versions for example).
- Make the solution more flexible, scalable and cloud-friendly deployment (allowing DBcloudbin deployments in cloud application platforms like Kubernetes).
- Simplify version upgrades: It would be as easy as launch a new container with the new docker image version.
The running components that make up a DBcloudbin installation are mainly two:
- DBcloudbin agent, to process all the requests launched by the CLI or indirectly by your application through SQL queries.
- DBcloudbin CLI tool, to launch the common tasks as executing archive or purge operations.
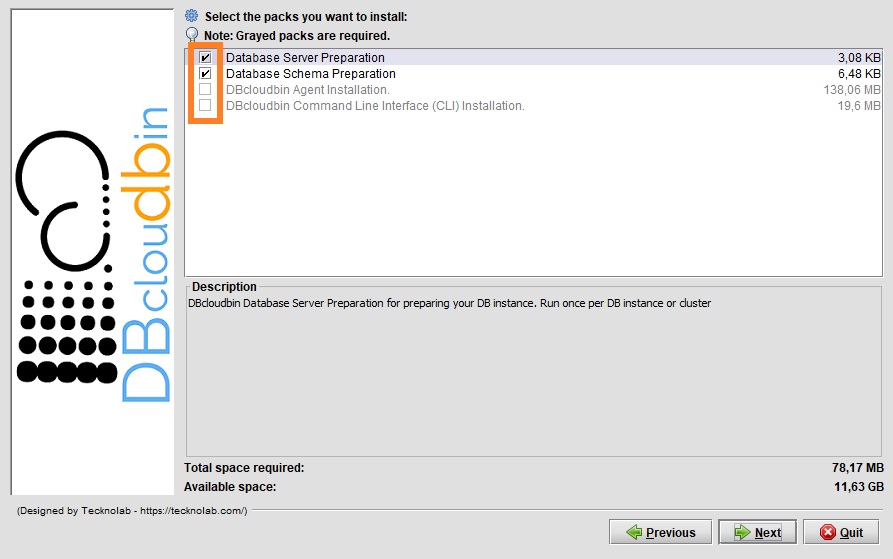
Since version 3.04 we are packaging and publishing in Docker Hub both components as images to be used as docker containers. IMPORTANT! This will not avoid the usage of DBcloudbin setup to configure the Database layer and adaptation of your application schema using the regular DBcloudbin install tool (you can request a FREE trial here). However you can install only the first two packages running the setup from any server or laptop with access to your database, and leave the agent and CLI running as Docker containers.
If you want to know how you can use our Docker images, follow the instructions explained below:
Agent
We need to pass in the docker run command the DBcloudbin configuration database as environment variables and an external port if we want (and we should, otherwise the database would not be able to connect with our agent) to expose the docker internal agent port 8090. The available environment variables are:
- DB_TECH: The database technology. By default ORACLE. Accepted MSSQL for SQL Server environments.
- DB_HOST: The database server host. By default, “oracle”
- DB_PORT: The database server port. By default 1521.
- DB_SERVICE: Only for Oracle connections. the listener service. By default, XEPDB1
- DB_PASSWORD: Database password credentials for the DBCLOUDBIN user created during setup.
- DB_CONNECTION: Only for Oracle, as alternative to the DB_HOST, DB_PORT and DB_SERVICE parameters we can define the full database connection (in a jdbc connection string, it would be everything at the right of “jdbc:oracle:thin@”, excluding this prefix).
The command to run it will be:
Sample agent launch command
docker run –rm -d –name dbcloudbin-agent -p8090:8090 -e DB_HOST=mydbhost -e DB_SERVICE=ORCLPDB -e DB_PASSWORD=”myverysecret-password” tecknolab/dbcloudbin-agent:3.04.02
IMPORTANT! Our running agent must be reached by our DB host using the name and port defined when we run the setup tool. If this is no longer the case, we need to adjust the address so that our database host is able to correctly resolve the name and port to access our Docker infrastructure and container, use the DBcloudbin setup again in update mode to reconfigure the name and port.
Command Line Interface (CLI)
After running the DBcloudbin agent, probably we will want to launch some DBcloudbin command using the CLI. To do it with a docker CLI container, it is very simple. There are a few environment variables you may need to use:
- AGENT_HOST: The host (or container name) where the agent is running. By default, “dbcloudbin-agent”.
- AGENT_PORT: The advertised agent port, by default 8090.
- AGENT_PROTOCOL: The protocol used to connect to the agent. By default, “http” but depending how you are using your Docker/Kubernetes infrastructure, you may be using a https network load balancer, so this parameter would be set to https.
Use the CLI with a docker command as the following (for connecting with an agent launched as described above):
Sample CLI command
docker run –rm -it tecknolab/dbcloudbin-cli:3.04.02 info
With the first launch, a CLI wizard will request us the target database credentials (that is the credentials of your application schema, the one selected in the setup for generating the transparency layer). To avoid introducing your database credentials every time you execute a DBcloudbin command, you must add an external docker volume mapped to the /profiles path.
Sample with external profiles folder
docker run –rm -it -v /my_profiles:/profiles tecknolab/dbcloudbin-cli:3.04.02 info
You can find the DBcloudbin Docker images in our Docker Hub repository (https://hub.docker.com/r/tecknolab).
by | | blog

DBcloudbin 3.04 added some new and cool functionalities to our solution. If you need a basic understanding on what DBcloudbin is before going through the new features, you have a solution overview section that cover the fundamentals and a DBcloudbin for dummies post series that goes one step back using a less technical language. For the “why DBcloudbin?” you may want to review our DBcloudbin vision post.
In version 3.04 we are introducing some important features that enhances our vision of simplicity and automation:
- Archive/Delete automation: Until version 3.03.x, archiving operations must be launched with DBcloudbin commands (CLI) manually or in a regular way with your preferred scheduler. With version 3.04.x, we offer an “install and go” solution, usable from the very first second, introducing the Archive/Delete Automation feature. When activated during setup or through configuration, DBcloudbin will automatically archive the new inserted or updated data; and/or delete (with the configured lagging days) the application deleted objects (both archive and delete can be activated independently). This feature can be enabled globally or at table level, so it allows us to activate the auto archive mechanism only for desired tables. This feature does not disable the current archive mechanism, so, for example, we could launch archive jobs manually to migrate the old data, and let the system automatically archive new data with the auto archive functionality enabled.
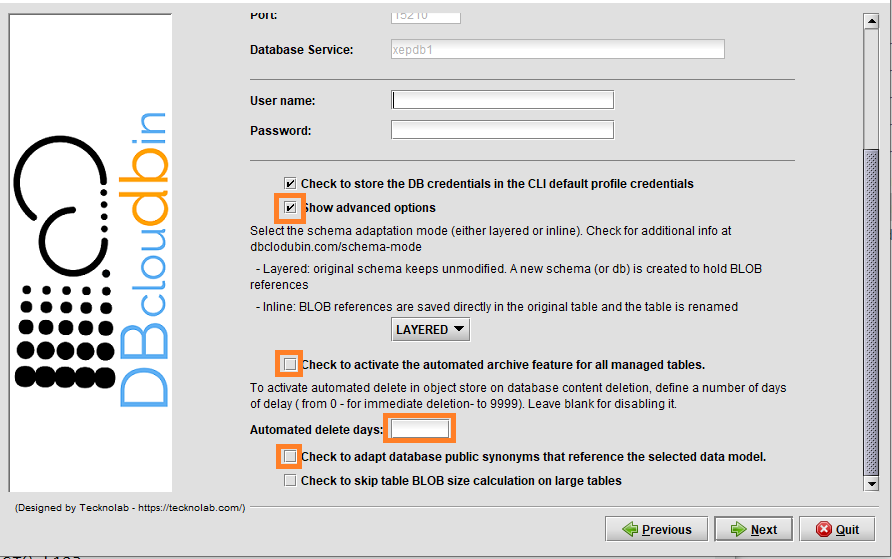
- Public synonyms redirection: DBcloudbin in default mode, creates a new schema (database in SQL Server) for the transparency layer avoiding any change in your original application data model. Depending on your application data layer design, it may not use a single database user for accessing the application data, but several ones (potentially one per application user), referencing the tables and other database objects through public synonyms. In this case, the way to ‘activate’ DBcloudbin is not changing the database connection but changing the affected synonyms to point to the transparency layer instead of to the application schema. This operation might be cumbersome and error prone when addressing complex schemas. DBcloudbin v3.04 addresses this problem with a new option (as highlighted in the previous screen), to automatically reconfigure the existing public synonyms pointing to the application schema. This way, after DBcloudbin setup, the environment will be ready for archive operations without any additional reconfiguration. As a bonus benefit, in the case of uninstalling DBcloudbin, the reverse operation will be also automatically executed.
- Metadata enrichment: In current times, metadata is very important, since it adds value to our data, allowing us to classify, analyze, search and a long list of additional operations that we could carry out with our data. The vast majority of object store infrastructure out there, support some type of metadata assignment to stored objects, that can be leveraged by different analysis tools with the strong benefit of offloading that work from the main application database. For this reason, with this new version, DBcloudbin allow us to add custom metadata defined by the user and based in SQL syntax queries over our database information. The metadata mechanism will allow us to define metadata form the DBcloudbin CLI tool (with -metadata option), with simple queries over the target table or more complex queries using the -join option to obtain metadata from different tables. Also, we could define alias for our metadata, using an expression like the following: {MY_ALIAS}. Additionally, the solution will store a Json file in the same object store path with, not only the custom metadata, but also the Built-in metadata associated to the original object. An example for that could be:
CLI example
dbcloudbin archive MYTABLE -metadata “CONTENT_NAME{FILENAME}, CREATOR{AUTHOR}”
In the previous example we are assuming that our table “MYTABLE” has an attribute “CONTENT_NAME” that we want to be mapped in our object store with its value in the tag “FILENAME”; the same for “CREATOR” (table attribute) and AUTHOR (object store tag name). This is the simplest way of metadata enrichment. The solution is more versatile. It supports any valid SQL expression, not only plain attributes. So if we are using Oracle and the attribute CONTENT_NAME may have uppercase and lowercase characters and we want our tag to hold only uppercase, we may use the following command:
Using expressions
dbcloudbin archive MYTABLE -metadata “upper(CONTENT_NAME){FILENAME}, CREATOR{AUTHOR}”
And there is more. Sometimes we need complex expressions or values where part of the information is not stored at the table we are archiving content from. For enabling that content, you can use a JOIN expression that logically links that data with the specific row in the to-be-archived table content. So if in the previous example, “CREATOR” in table MYTABLE is just and internal id, but the real creator’s name is in the table CREATORS we could use the following archive command:
Using joins
dbcloudbin archive MYTABLE -metadata “upper(CONTENT_NAME){FILENAME}, CREATORS.FULLNAME{AUTHOR} -join “CREATORS ON CREATORS.ID=MYTABLE.CREATOR”
Special shortcuts like @PK (will define the complete primary key as metadata) or @ALL (will define all the target table fields as metadata) are allowed to define metadata in a simpler way.
Special shortcut expressions
dbcloudbin archive MYTABLE -metadata “@PK”
- Improved monitoring: We have included all auto archive information in the DBcloudbin CLI info command, adding last execution information like the total processed objects and execution time or the specific error messages if something is wrong. To get it, we will use the -verbose option. Additionally, this new version includes the -format json option to get a Json friendly output, very useful for scripting and automation processes.
- Docker/Kubernetes support: New version comes with the support of containerized packaging for our agent and CLI, so that it makes it very simple to deploy DBcloudbin agent in Kubernetes clusters or Docker environments. We will discuss this in greater detail in a specific post in our blog.
There are some other minor features that can be checked in our release notes but these are the most relevant.

by | | blog

Big Data collection is taking center stage with people and businesses rapidly shifting to digital technologies amid the COVID-19 crisis. Big Data refers to the massive amounts of unstructured or semi-structured data collected over time from social networks, RFID readers, sensor networks, medical records, military surveillance, scientific research studies, internet text and documents, and eCommerce platforms to name but a few. By 2026, the global market for Big Data is expected to be worth $234.6 billion.
Experts are predicting that Big Data can revive the economy and help businesses thrive. When collected, stored, and analyzed properly, it allows organizations to glean new insights. However, there are also limitations to Big Data analytics. If a business is amassing Big Data without a concrete strategy, all that data may end up unused or even underutilized.
Three Benefits of Downsizing Big Data Analytics
With Big Data, some companies have a “more is better” mentality, which isn’t necessarily the best approach. Modern businesses need data to gain insights and make better decisions, but injudiciously collecting data can be unhealthy and costly for the organization. So, here are three benefits of downsizing your Big Data analytics:
- Increase focus on data quality: Big Data analytics requires quality datasets to solve important problems and answer critical questions. It won’t be able to fulfill its intended purpose if the data is incorrect, redundant, out of date, or poorly formatted. It’s necessary to “clean” and prepare data; otherwise, it won’t work, even with the best practices in real-time analysis.
- Minimize resources needed to maintain databases: Massive datasets naturally require vast storage arrays for optimal computing power, speed, and security. Although data storage options are expanding, most warehoused data solutions can cost millions of dollars to maintain and operate – these data centers require huge amounts of electricity to run and to cool. Having more data means spending more on storage.
- Improves ability to transform data into actionable insights: It’s difficult to derive truly valuable information from an infinite pool of data points, which could be as varied as each unique customer you serve. You don’t need more data; you need the right data. Downsizing your database allows you to maximize the information available to you and create comprehensive, targeted customer profiles on a granular level.
How to Start Downsizing Big Data
Around 80% of a data scientist’s job revolves around getting data ready for analysis, so it’s unsurprising that most top data analysts have advanced degrees in math, statistics, computer science, astrophysics, and other similar subjects. However, the role is ideal for anyone who is curious and has strong problem-solving skills. Many colleges and universities have produced graduates who fit the criteria, so businesses won’t have a hard time finding someone with the right credentials to improve their Big Data analytics processes, despite COVID-19.
Of course, given the intricacies of Big Data, it certainly helps to hire a team that already has prior knowledge and experience with data, including a data scientist. Their understanding and application of Big Data make the specialization one of the most in-demand careers in data analytics today. These specialists are taught to apply advanced analytics concepts, like combining operational data with analytical tools. This allows them to easily determine how best to reach an audience, increase engagement, and drive sales. Having these Big Data scientists on your team can provide you with more insights and guide you to making more informed decisions.
Alternatively, you could choose a third-party solutions provider to help you downsize your database. DBcloudbin is a transparent and flexible solution that selectively moves your heaviest data into an efficient cloud storage service. Some benefits of a database downsizing solution include significant infrastructure cost savings, simplified backup, and stronger analytics performance.
To learn more about DBcloudbin’s features, try our promotional free service today.
Editorial written specially for dbcloudbin.com
by Jianne Brice
by | | blog

In a previous post we discussed about using OCI object storage with DBcloudbin. Since v. 3.03, the solution supports Oracle ‘s Autonomous DB, its flagship Cloud database product. Autonomous adds some new and interesting features, as its DBA automation capabilities, while defining some subtle differences with a plain/old Oracle Std or Enterprise on-premises implementation. Those restrictions and limitations make a non-obvious task implementing a tightly integrated solution as DBcloudbin, so let’s go trough a step by step process. For the regular DBcloudbin implementation procedure, you can check here or visit the Install guide in your customer area.
NOTE: It is out of the scope of this article to discuss about the networking and network security aspects of OCI. As in any DBcloudbin implementation, you will have to ensure connectivity from the DB instance to the DBcloudbin agent and viceversa. Check with your OCI counterpart for the different alternatives to achieve this.
Autonomous DB requirements.
The most relevant differences from a DBcloudbin implementation point of view, are:
- Use of wallet-based encrypted connections. Autonomous DB requires the use of a ciphered connection that is manage through a wallet. When setting up the DBcloudbin to DB connection in the setup tool, you will need to specify your wallet info. More details later on.
- DB to DBcloudbin connection through an https connection only. Autonomous DB restricts the outbound connections that the DB can do to external webservices (as those provided by the DBcloudbin agent). It is required an https URL using a valid certificate from a specific list of certification authorities (so you cannot use a self-service certificate). This requirement has more impact that the previous one, so we will concentrate our detailed configuration to overcome this limitation.
Wallet-based connections
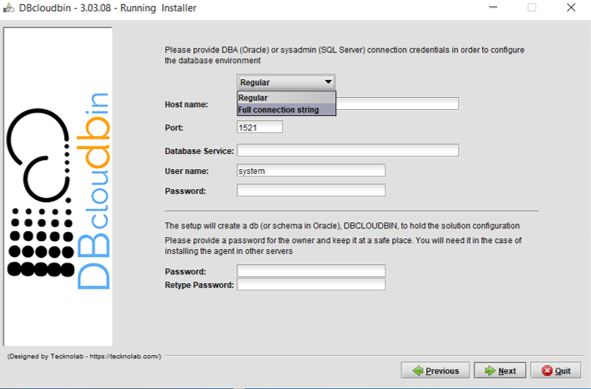
When provisioning an Autonomous DB in Oracle Cloud Infrastructure (OCI), you will generate and download a zip file with the wallet content for ciphered connections to that DB. Just copy the wallet to the server(s) where DBcloudbin will be implemented and extract its contents in a folder with permissions for the OS ‘dbcloudbin’ user (as /home/dbcloudbin/wallet). Then, when executing the DBcloudbin setup tool, select the option “Full connection string” instead of “Regular“. This can be used not only for Autonomous DB connection but for any scenario where we want to provide a full connection string as, for example, when using a Oracle RAC (Real Application Cluster) and specifying the primary and standby connection. In this case, we can simply specify a wallet based connection as <dbname>_<tns_connection_type>?TNS_ADMIN=<wallet_folder> (e.g., “dbdemo_medium?TNS_ADMIN=/home/dbcloudbin/wallet“). Check the details of Autonomous DB connection strings here.
Configure https connections to DBcloudbin agent
Autonomous DB will only allow outbound webservices consumption through https connections using ‘legitimate’ certificates. This will impact in two specific DBcloudbin setup configuration/post-configuration steps:
- We need a valid certificate (not self-signed).
- We need to configure the agent connection through port 443.
If we do not want to use (and pay) a trusted certification authority certificate, we can use the valid workaround of passing the DB to DBcloudbin requests through a OCI API Gateway created for routing the autonomous DB requests to our installed DBcloudbin agent. Since the OCI API Gateway will use a valid certificate, we can overcome this requirement. But, let’s go step by step and start by installing DBcloudbin.
Go to the host you have provisioned for installing DBcloudbin (we are assuming it is hosted in OCI, but this is not strictly necessary; however, it is supposed to be most common scenario if we are implementing DBcloudbin for an Autonomous DB) and run the setup tool. In the “Agent address selection” screen, overwrite the default value for the port, and use the standard 443 for https connections. If you will use a legitimate certificate (we recommend to install it in a OCI network balancer instead of in the DBcloudbin agent) and you already know the full address of the network balancer you will use to serve DBcloudbin traffic, use the address in the “Agento host or IP” field. If you are going to use an API Gateway, at this point you still do not know the final address, so just fill up anything (you will need to reconfigure later on).
At this point, we should have DBcloudbin installed, but it is unreachable, even through the CLI (dbcloudbin CLI command is installed by default in /usr/local/dbcloudbin/bin folder in a Linux setup). We have setup DBcloudbin so that the agent is reached by https in standard port 443, but we are going to setup the ‘real’ service in the default 8090 port, using http (if you want to setup an end-to-end https channel, just contact support for the specific instructions). So, let’s overwrite the configuration by editing the file application-default.properties in <install_dir>/agent/config. Add the property server.port=8090 and restart the service (e.g. sudo systemctl restart dbcloudbin-agent). At this point (wait a couple of minutes for starting up) we should be able to connect to “http://localhost:8090” and receive a response “{“status”:”OK”}“. This shows that the agent is up&running.
We need to overwrite in our CLI setup the dbcloudbin agent address, in order to connect to it. So edit the file application-default.properties at <install_dir>/bin/config/ (should be blank, with just a comment “# create”). Add in the botton the following lines:
# create
dbcloudbin.endpoint=http://localhost:8090/rest
dbcloudbin.config.endpoint=http://localhost:8090/rest
Execute a “dbcloudbin info” command (at <install_dir>/bin) to check that the CLI is now able to contact the agent and receive all the setup information.
We also need to instruct DBcloudbin that invocations from Autonomous DB to the agent will be through https. This is configured with the following setting:
dbcloudbin config -set WEBSERVICE_PROTOCOL=”https://” -session root
Set wallet parameter
When using a https connection with Oracle, DBcloudbin will read the optional parameters ORACLE_WALLET and ORACLE_WALLET_PWD for finding the location of the certificate wallet to be used by the Oracle DB for validating the server certificates. Autonomous DB does not allow the configuration of a private wallet (it just ignores it) but we still need to set this parameters at DBcloudbin level; otherwise any read operation, would fail.
Just execute DBcloudbin CLI config commands for both parameters, with any value:
dbcloudbin config -set ORACLE_WALLET=ignored -session root
dbcloudbin config -set ORACLE_WALLET_PWD=ignored -session root
Setup a API gateway (optional)
Now, it is time to setup our OCI API gateway to leverage the valid certificate https endpoint we will get when exposing our DBcloudbin agent through it. Go to your OCI console and in the main menu, select Developer Services / Gateways. Create a new one.
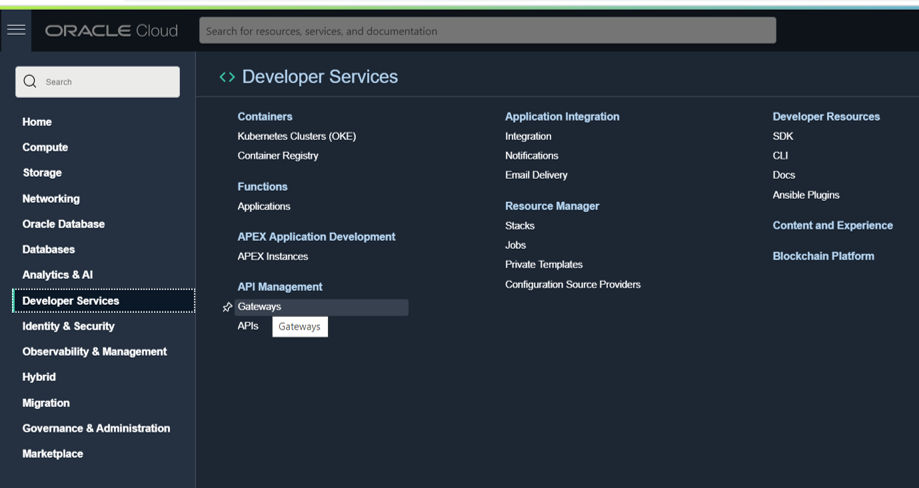
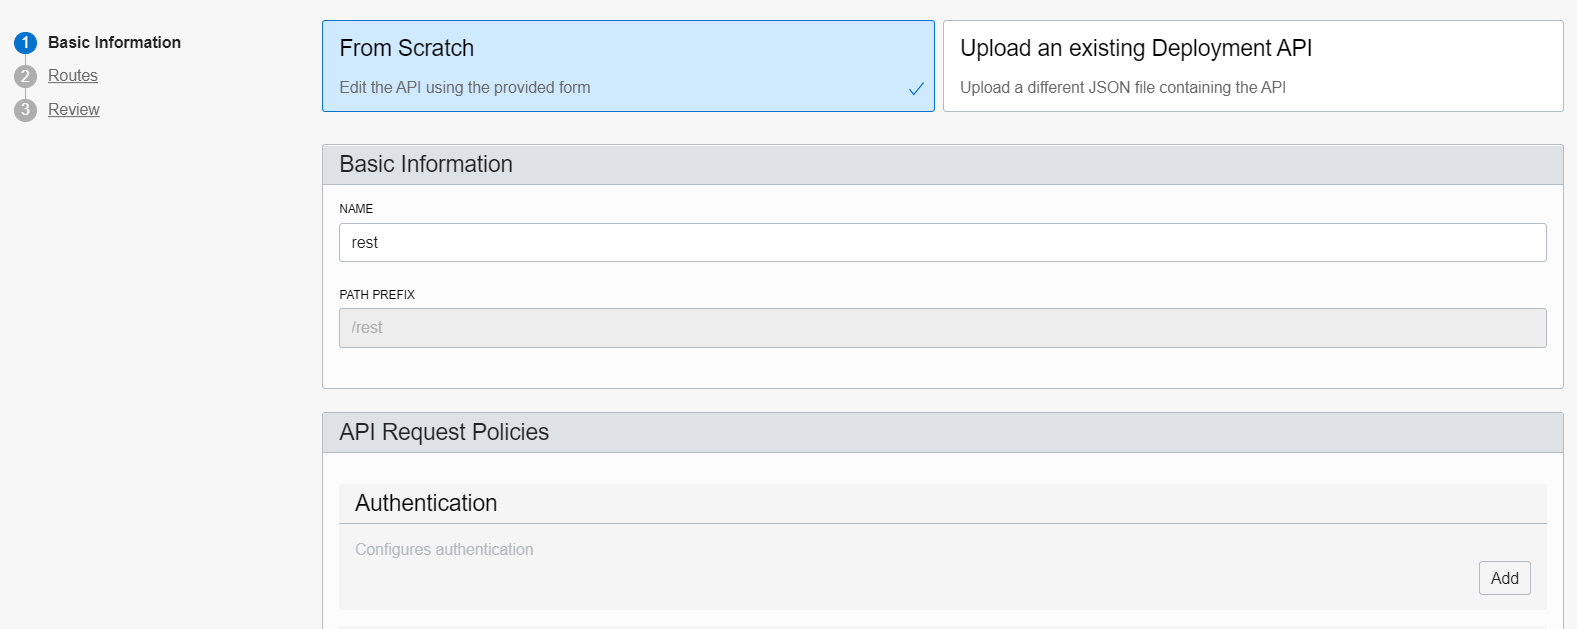
Once created, add a new Deployment (at left-hand side). Give any name (e.g. “rest”) and set as path prefix /rest. Press Next to go to the routes form.
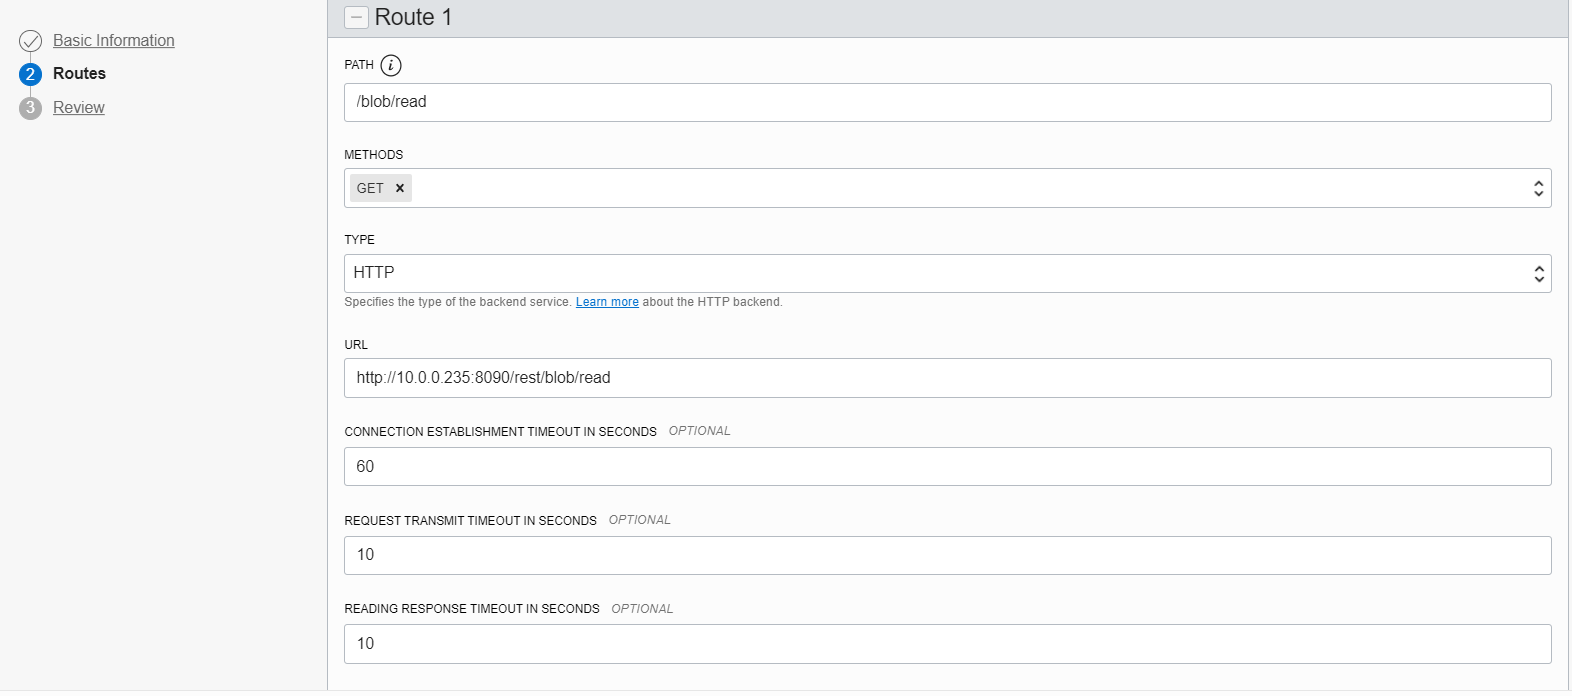
Create a route with method “GET” and path “/blob/read“. Point that route to the URI http://<dbcloudbin-agent-host>:8090/rest/blob/read. See figure below. Confirm the configuration and wait for the API gateway to be configured.
Once ready, check the https URI generated for the API gateway endpoint and test it (for example with a curl command). An invocation to https://<api-gateway-endpoint>/rest/blob/read should return a blank result but should not fail (return a 200 HTTP code). Once this is working, we are ready to finish the setup and have the implementation up&running.
Final step. Reconfigure DBcloudbin endpoint
We need to reconfigure the DBcloudbin agent endpoint in our setup to point to the newly created API gateway https endpoint. So, execute the DBcloudbin setup again, but instead of using the ‘New setup option’, use the “Upgrade SW and DB configuration” (not matter if you are using the same setup version).
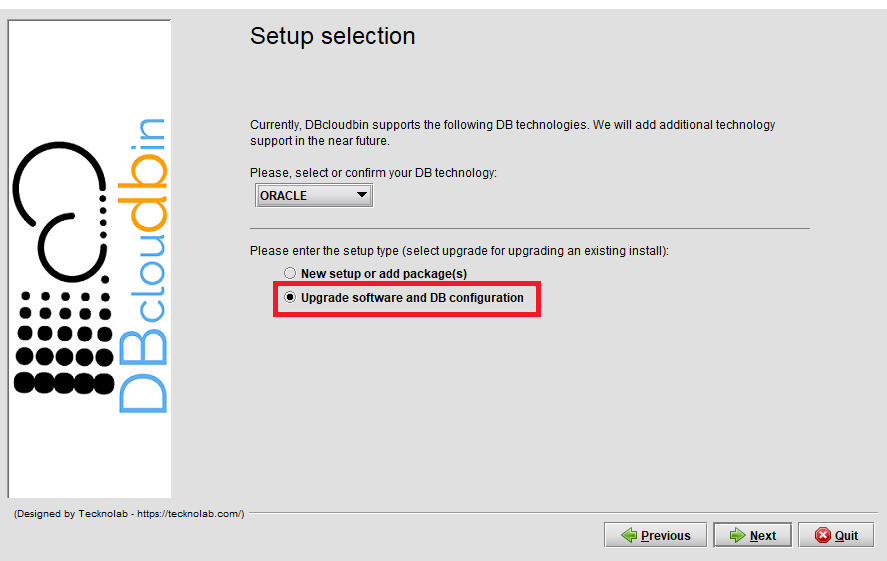
After providing the DB credentials, you will see the agent host and port configuration screen with the host value and port value (443) configured during the initial setup. Change the host value by the API gateway fully qualified host name (e.g. nfbwza67ettihhzdlbvs7zyvey.apigateway.eu-frankfurt-1.oci.customer-oci.com). You will be requested DBA credentials (as the ‘master’ ADMIN user) in order to reconfigure the required network ACL’s to enable communication with the new endpoint.
It is all set. Go to the DBcloudbin CLI and execute a “dbcloudbin info -test” that will test the full environment and DB connectivity. If it works, you are done, is time to reconnect your application through the created transparency layer and start moving content out to your object store. If not, check the error message and open a support request to DBcloudbin support.
Summary.
The Autonomous DB specific restrictions make setting up DBcloudbin a little bit more tricky, but perfectly possible. We can leverage all the product benefits and avoid exponential growth in our Cloud DB deployment as we do with our on-premises environment.

by | | blog

A large-scale dataset stored in an Enterprise DB (usually Oracle) with a multi-TB volume of binary data, represents a fantastic opportunity for huge cost savings using DBcloudbin but, at the same time, is a challenging scenario as in any massive data migration project out there. We need to massive-data-migration-automation. We will do a introduction to this scenario in this post and how DBcloudbin automation framework is able to handle all the process.
Let’s assume we have a large scale database with TBs of binary data and we have successfully installed DBcloudbin. For a quick introduction on the solution basics, check our DBcloudbin for dummies post; for high-level overview on the install process, check here; for the complete details, you can register and get the install guide.
With the solution implementation we get a functional environment where the customer application is able to access the data from the database as before, regardless of whether the data is hosted inside the database or moved out to a more efficient and cheaper object storage. However, after implementation we have 100% of the data still hosted at database, so we have to do the ‘heavy lifting’ of moving all our binary dataset. In a regular DBcloudbin implementation we will typically define a data migration rule to be executed recurrently (usually daily) for moving the data based on our specific business rule (e.g., reports with status ‘X’ and more than ‘y’ days old). This is fine for dealing with the new data that lands in our environment in a daily basis but for a massive historical migration will not be valid, since we may need weeks to move all the data. So, we need a different strategy for massive data migration.
We have created a simple yet effective mechanism for massive data migration automation where we provide the following artifacts:
- A simple framework, leveraging DBcloudbin configuration engine and DBcloudbin operations & activity dashboard for the foundational pieces of defining the migration plan and monitoring it.
- A set of automation scripts that can be used to configure and automate the migration process, while feeding the results to automatically update the monitoring dashboard with the progress and potentially any issues that would require further analysis or troubleshooting.
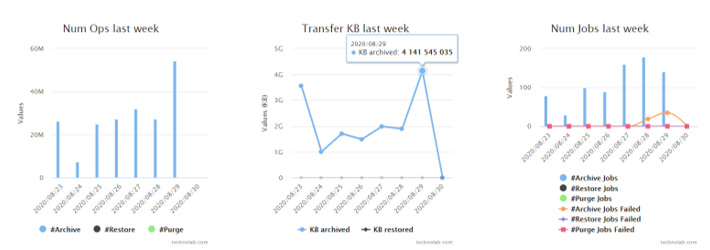
The method, in a nutshell, is:
- We should analyze and split our to-be-migrated data by batches. This is not strictly required, but very convenient for monitoring and scheduling purposes. For example, we can define batches by historical criteria (documents from year XX). Once identified, we can create an csv file with the batches list, including inventory data as the total number of objects and total data volume per batch. This is easily created with a simple SQL query through your dataset. With that csv file we can ask DBcloudbin support team to setup the Massive Migration Dashboard with our batches definition.
- We download the massive migration framework from the link provided by DBcloudbin support in the response to the previous request. The framework comprises basically a simple user guide with the parameters to configure in our DBcloudbin environment (they are regular parameters with just specific id’s that start with the prefix “x.” and help us to tune the framework behavior (we will explain it later). So we simply leverage the high available, distributed configuration engine of DBcloudbin for setting the relevant parameters for our migration strategy. This way, we can scale horizontally our implementation with additional DBcloudbin nodes and automatically they will handle and share all the migration settings. This is very important for quickly adapting our migration throughput to our expectations depending on the computing power we have available (we recommend using virtualized infrastructure for additional flexibility).
- Configure the massive migration script (from the framework) for daily scheduling in our DBcloudbin nodes (usually in a simple cron configuration). Since the script will use the settings at the configuration layer, it is basically inmutable and you are not expected to change the cron configuration during the whole migration project.
- Test and monitor the logs. If all is OK, our daily migration runs will be automatically consolidated in the Massive Migration Dashboard in our DBcloudbin website customer area (it is provisioned when we request the framework in the step 1). There, we have a simple but informational dashboard on how our migration tasks are doing, the migration rates per batch, the failed jobs and the expected complete time.
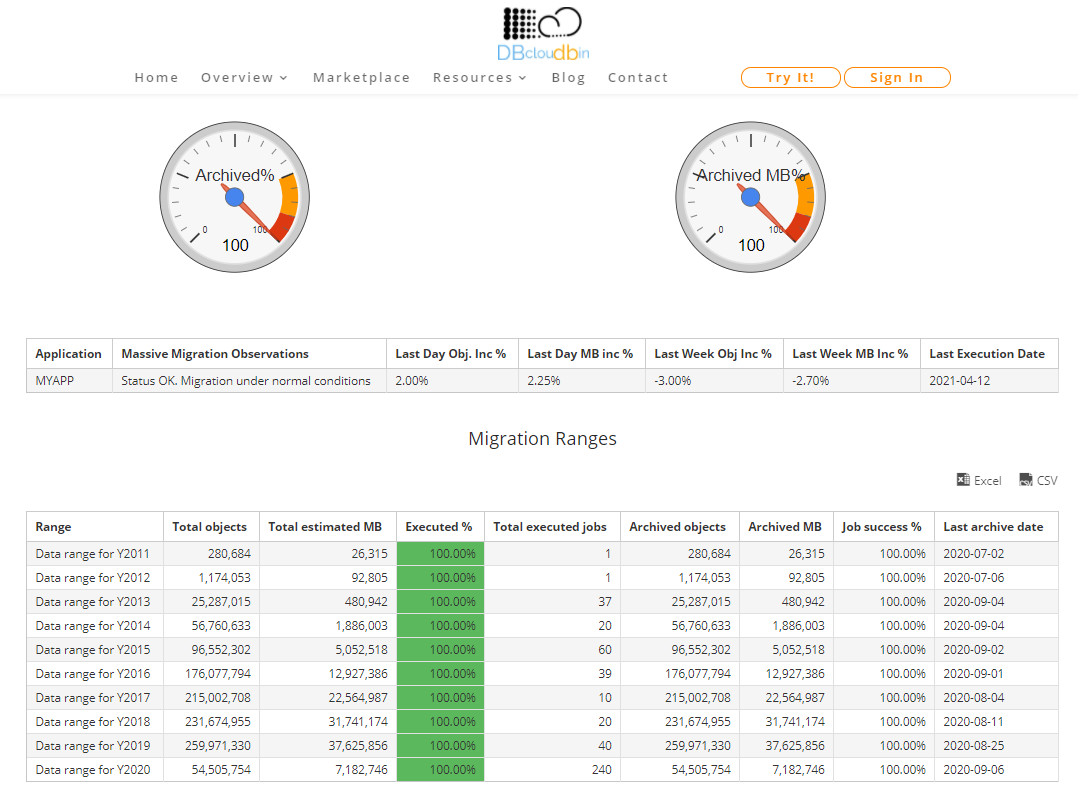
Configuring the migration settings
As described above there are a series of configuration settings that we can use to customize how we want to handle the massive migration:
- Active/Inactive: This is a global switch that we can use to stop/restart our migration jobs. This way, we can temporarily stop the migration in all our migration nodes (that may be many) from a central point.
- Filter: This is where we define the logical expression for the objects that define the active batch. If we want to migrate objects for the batch “Year2010” that represents the historical documents from Y2010, we need to define here the ‘where’ clause in our data model that would select the documents for this year (may be something like “EXTRACT(year FROM document.creation_date = 2010)” ).
- Batch: The batch id should match the filter criteria by one side and the batch id we defined in our csv of batch definitions. So, if we decided to split our batches by historical year of data and named in our csv file the 2010 batch as “Y2010”, this parameter should be set as “Y2010”. This way, the DBcloudbin massive migration backend is able to identify this migration statistics to the specific batch and aggregate the statistical data in the migration dashboard.
- Core settings: There are a number of additional settings that will usually not be changed during the migration project (but they can be modified when required, of course):
-
- Table name: The table that contains our to be migrated data. We should configure the engine in a ‘per-table’ basis if we have more than one.
- Migration window duration: We can set the maximum allowed time for a migration run. This way we can configure the process to run only in low workload periods (e.g. nightly runs). The framework will automatically stop and start again the next day at the point where was interrupted and statistics will be aggregated without any manual intervention. This can even be tuned for labour and weekend days to configure different migration windows.
- Number of workers: We can define the parallelization level for each migration job in order to tune the migration throughput depending on the computing and networking capacity of our environment. This may also require some tuning depending on the average object size of our data (the smaller the object the better a high number of workers for maximize throughput). DBcloudbin support will provide guidance on this.
- Log files directory & options: Where we want to store the detailed activity and error logs (and if we want to log performance counters for tweak or troubleshoot performance issues). This will be normally used only for detailed troubleshooting of migrations errors that are recorded in the Migration Dashboard.
- Errors threshold: In massive highly parallelized migration jobs is normal to receive errors from the object store platform we are using for migrating the content to. DBcloudbin is very conservative in errors and, by default, a job is aborted if any error is produced. In massive migration jobs where we are executing jobs that are expected to work during several hours this is not convenient (an object write error does not produce a specific problem, the transaction is rolled-back at database level and the object keeps secured stored at the database). This setting will allow us to define a higher threshold sol we will only consider a migration job as ‘failed’ if it trespass this threshold.
Using this framework we have successfully executed massive data migration projects. If you want to check in greater detail one example, we suggest requesting our Billion+ objects project whitepaper, where it is technically described the migration of a large Exadata platform with more than a billion objects.
by | | blog
In a previous post we discussed about the potential use of DBcloudbin in a reverse way: not for moving content to Cloud but to make Cloud content available to regular (potentially legacy) apps through its relational database. In this new post we will explain in greater detail the technique, with a sample app using Oracle.
The “nibdoulocbd” project consists of using our DBcloudbin solution in an reverse way, to provide our applications with access to documents that we already have stored in the Cloud, with minimal modifications in our application and in our data model. Let’s go with the details…
To carry out this “reverse re-engineering” process, we have selected one of the demo applications provided by the Oracle APEX development platform, but this process could be carried out on any of our applications running on Oracle or SQL Server. For simplicity, we configured an Oracle APEX environment on Docker; you can follow the following tutorial.
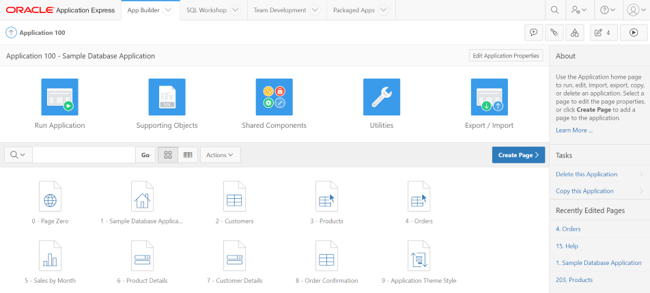
Once we have configured our environment with Oracle Apex 5.4 with a workspace called DEMO, it is time to get down to work. The first thing we will do is access our DEMO workspace through the APEX URL, in our case http://localhost:8080/apex/:
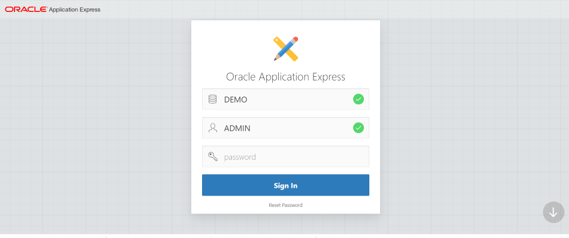
We see the application on which we will base this example “Sample Database Application” that is a sample business application able to manage sales orders (if it does not appear directly, you can install it from the Packaged Apps tab).
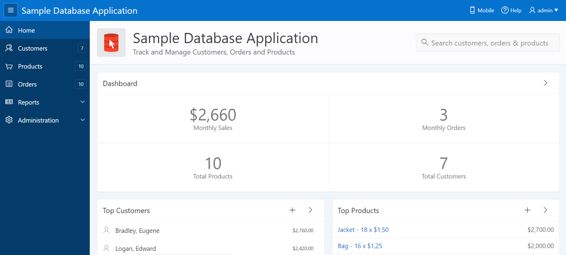
Data Model modification
APEX is obviously designed for easy handling of data through the database, but at this point we do not have an attribute (a BLOB type) in the database representing our external Cloud content, so we will have to modify our data model to treat binary data. We would like the user to be able to access the purchase orders in PDF format that we have stored in a S3 bucket in the Cloud from the “Orders” tab in our application; this way our application will handle in the same tab the ‘order data’ already processed with the pdf that we have received with actual order document. This seems a good feature to have.
For this, the only necessary modification in our data model will be to add the necessary fields to the DEMO_ORDERS table to achieve this purpose. This will be as simple as executing the following SQL statement from our preferred SQL client on the DEMO schema.
ALTER TABLE DEMO_ORDERS ADD ( CONTENT BLOB NULL );
Application Modification
NOTE: This is not required in a regular DBcloudbin implementation. In our “flipped over” sample scenario we need it because our application is not currently handling documents (binary content), so we need a minimal application enhancement.
In this section, we will modify our Demo application so that it is able to access and show the user the data “stored” in the columns that we added to our model in the previous step. To do this, we access the APEX App Builder menu. After selecting the edition mode of our application “Sample Database Application”, the design window of our application will appear.
We select the page to modify, in this case our “Orders” page. Once inside the page designer, we will select the Content Body / Orders section, where we will modify the SQL query to show a new column on the page with the link to our PDF documents. We add the following line to the existing SQL statement, which will allow the application to have visibility of the new CONTENT column:
… o.tags tags, sys.dbms_lob.getlength(o.content) content from demo_orders o, …
We save the modifications and the new CONTENT column will appear as part of the Content Body of the “Orders” page. When selecting this field in the properties screen we will see the following values:
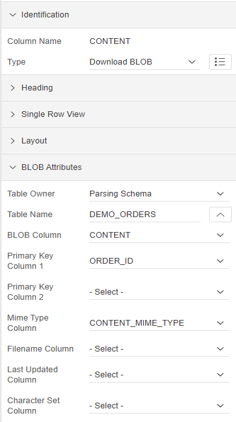
With these simple steps our application will be ready to access documents stored in our database. But, as we commented previously, the idea was not to access the binary data directly in our database, but rather that what we wanted was to access our documents stored in the cloud, and thus avoid the loading in our database , occupying a huge and unnecessary amount of space in it. This is where DBcloudbin comes into the picture, after a quick and simple installation (you can find how to carry out said installation in the following link), and by selecting the DEMO_ORDERS table as the table managed by the solution, we can access the data of our storage in the preferred cloud (Amazon S3, Google Cloud, Azure,…).
To finish this short tutorial and have access to the cloud data, we will have to perform two last actions:
The first, and as part of the DBcloudbin installation / configuration process, we must modify the configuration of our application so that it uses the new transparency layer generated by the DBcloudbin installer (previously it must have been made visible to APEX from its administration panel). To carry out this modification in our Demo application, we will access its edition menu, from the “App Builder” tab and select the option “Edit Application Properties”:

Where, within the “Security” tab, we can modify the scheme to be used by the application. Therefore, we will modify this scheme so that the application uses the transparency layer generated by DBcloudbin: DEMO_DBCLDBL. After this minimal configuration change, the application will be using the transparency layer generated by DBcloudbin to access the data, accessing it, in the same way as it did until now (without internal modifications of queries or other hassles).
As a last step, and since the movement of data to the cloud has NOT been managed by DBcloudbin, to have access to them, we must manually add the links to each of the PDF documents we want to access. To do this, we must insert these links in the DEMO_ORDERS_DBCLDBL table, belonging to the DBcloudbin transparency layer. In our particular case and assuming that the name of the PDF documents stored in the cloud is the purchase order identifier, we can make a simple insertion with an SQL statement similar to the following:
INSERT INTO DEMO_ORDERS_DBCLDBL SELECT order_id, ‘/<bucket_path>/’||order_id||’.pdf’ from DEMO_ORDERS;
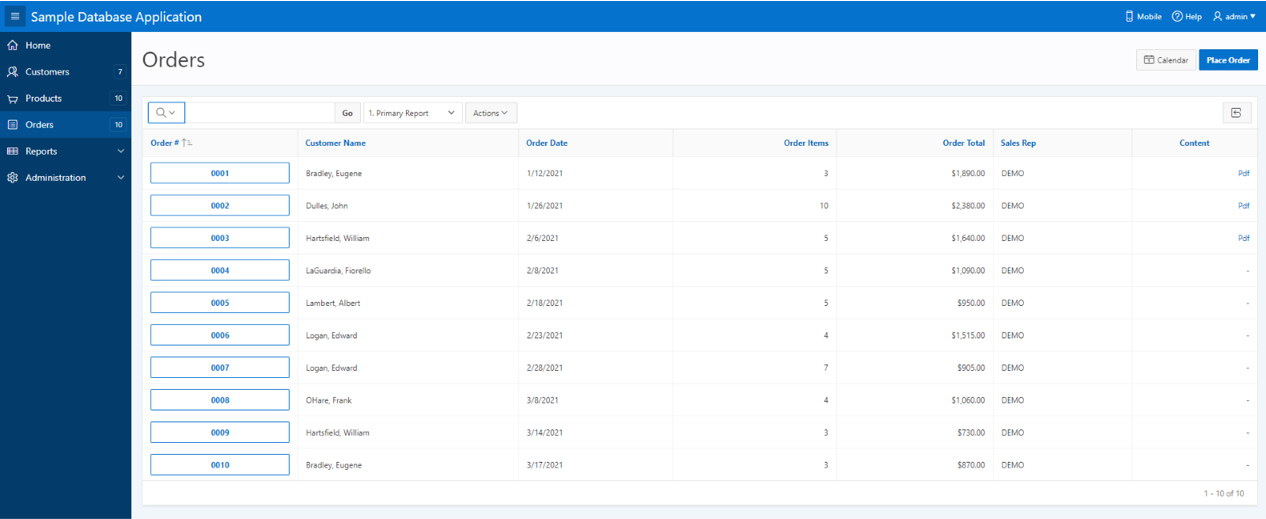
Where the <bucket_path> is the path in our S3 bucket where the documents are located. Once we have all the links inserted in the transparency layer, the documents will be perfectly accessible from our application as if they were contained within the same database:
Hope you find interesting this alternative usage of DBcloudbin solution.


